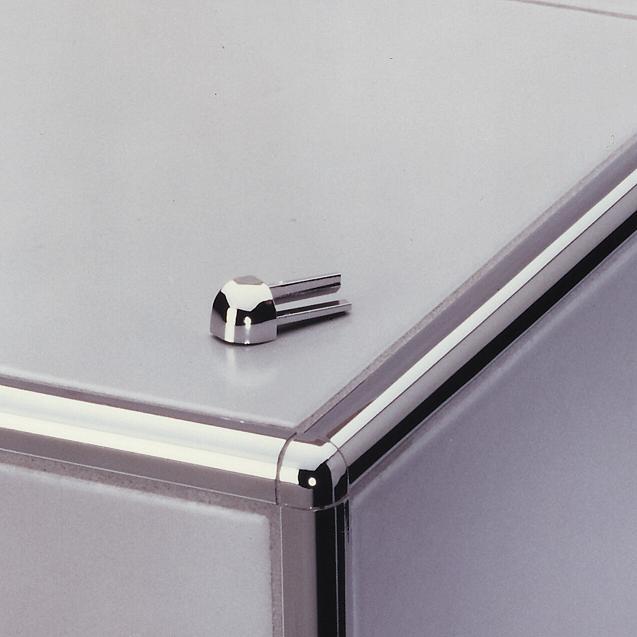
Hey Francis
Thanks for joining!
The only way that I know to do an outside corner that looks good is to purchase the outside corner pieces. Otherwise, you end up with an ugly joint from having the vertical edging meet the top schluter profile
Here is an amazon link: https://amzn.to/2QWuClU Hopefully you can get it in time for tiling
thanks
steve
Hey Chris
Been there with the fire code deal! You can notch the studs in the area of the flange on the opposite wall of the firewall to get that additional 1/8-1/4″ needed. I would recommend keeping the 5/8″ drywall off of the firewall till tub is set and then slide it down behind tub flange when everything is plumbed and done
And you have the right idea on setting the tub with no access. Its a pain to line things up and constantly be lifting the tub up to adjust things. Just try to account for the 1/8″ or so that each piece of pipe will sink further into fittings when actually glued
And if you plan to set with mortar, make sure you mix it pretty loose (easily pourable) so that you are not fighting the mortar when setting tub
thanks
steve
Ever since they came out with reasonably priced lasers 10 years ago or so, I’ve been using a laser to set the first row and never went back to a ledger board. Always found it to take more time and effort to piece in later, plus as you mentioned there is a waterproofing issue that will need fixed
I have not found a situation yet, where I’ve gone back to the ledger board….
I guess maybe if I was held up by a tile order and did not have the shower floor tile, I’d consider going back to the ledger method
Thanks for the feedback
If you have any specific questions about your project let us know
steve
Hey Charles
Sorry for delayed response here…..
I’m pretty sure you will only be a 1/4″ off if you cut 12″ off a 36″ x 48″ pan. The pans are tapered at 1/4″ per foot
But you have the right idea to make up for that difference (tiling walls with starting at the low side of pan and work your way around.) It won’t be that tough to do and shouldn’t have a problem adjusting for that. I’ve cut plenty of pans down that much
And your right, you could reduce some of that difference by shifting drain more towards the shower faucet wall and cutting the pan from both sides. Probably look better to get as close to center as you can
You will like Wedi. Its a very simple system to put together. Just measure a few times before cutting! Their pans are expensive!
Hey Edward
That is a very tough thing to gauge with those type of tub surrounds….
I know a lot of plumbers that leave the valve unattached to anything (as showen in your diagram) and then cut the hole centered in surround where needed, and use wood blocking between valve and surround (tightening escutcheon plate to keep things in place)
I would probably advice having a 2 x 6 or some kind of blocking between studs where valve would be placed, then screw it in place after the surround is in place. That way you can add blocking/shims behind valve to get into correct depth.
As far as the tub spout…..you will need to anchor that before tub surround. I’d probably set blocking 1″ recessed behind front of framing and fasten it there.
Other alternative, it so try to get an accurate depth of where the finished surface will be for surround and adjust and mount valve to that amount.
Any sorry, your right, we haven’t gotten into the fiberglass or plastic surrounds….Guess because most people are tearing those out and doing tile…..
thanks
steve
Hey Eden
thanks for the info, And everything comes out much better when Jeff is there to video. No doubt some of our earlier videos are rough around the edges…. Working in my clients homes and sticking to a schedule and videoing is definitely challenging!
Some day the plan is to fully focus on this and not have day jobs to keep it going, Lol!
Hey Kathleen,
Not a big deal….. I have some bad cuts every now and again too
Just cut off the peeling paper, and then apply some paper tape that overhangs the edges. Might have to do a few pieces to cover all angles of it.
You will have to apply a second coat over the tape and sand down like any other joint
Then cut the excess overhanging can after it dries
steve
Hey Edward,
Most shower faucets are pressure balanced. So you need both hot and cold supplies connected to valve to work properly.
A lot of companies have gotten away from the pull/push function. Typically turn couterclockwise to turn on
thanks
steve
Hey Eden,
That’s awesome that you are moving towards making a career out this! There is definitely a shortage of competent, educated & skilled labor out there. You will find that bathroom remodeling will be easy to advertise and obtain clients. The showers and tile designs somewhat sell themselves, plus it is pretty much the most expensive and labor intensive square footage in a home. And everyone has 2 or bathrooms, so good chance of repeat business!
you are right, trade schools will get give you an overview, but nothing specific. I went to trade school as well 20 years ago. So many more resources online since then! Which is one of the reasons I teamed up with Jeff, to demonstrate and show others how to remodel bathrooms, giving back because so many others have helped me out over the years.
So to your questions. It really depends on the manufactures recommendations. If the tub can be installed with mortar, then I go that route. It really gives the best support for a tub and gives it a solid feel. The Bootz tub had a foam base that does not recommend mortar. Pretty much set it in place and mount to studs with fender washers. And the way its mounted to studs are also in manufactures specs
You always want to follow the manufactures specs so that the warranties are held up.
Look forward to seeing and helping out with your projects! Crazy people would layer over 3 or 4 times, lol!
steve
Hey Eden
I think once things get to be about a 1/2″ out of level, then you might want to consider using a floor leveler or make an adjustment with framing (leveler is usually easier, especially if you don’t plan to replace subflooring)
A 1/4″ will not be noticeable, and you could technically level it out with additional thinset on the low side (if using large format tile)
thanks
steve
So for the caulk joint at tub to floor you could use the mapei matching silicon caulk. They should have the same color name that you used in grout. https://amzn.to/2usPDtV
Hey Mellissa
So sorry for the delayed response
So with the FA. anything that needs filled in again try to scrape it down to where you at least have a 1/16″ to fill. If you can get down a little further that would be best…..but not necessary
If your installing wood base, I would just get as tight to the floor as you can and nail in place. I would not caulk the base to the tile….that will be an area that will end up cracking and will probably look bad over time
Any additional questions let me know. I have this thread on to notify me
thanks
steve
Hey Doug
At the ceiling joint…..I’ve stopped using the matching grout caulk for that. I’ve found it looks better to just caulk with a siliconized latex caulk and paint it with the ceiling. I’ve never had great luck with caulking that with a colored caulk and look that great. That being said, my joints at ceiling are 1/16″ or less, so it might depend on the size you have
Hey Edward, sorry for delayed response
So yes, this is a typical situation, but normally not an issue when tiling.
And the additional 1/2″ layer will solve the problem for sure
Other alternative is too use a good metal blade on a sawzall and cut the 1/2″ off of the caste iron pipe (cutting flush with subfloor), then run all vinyl and install the push-in fitting on top
steve
